Testing Heat Sink Materials
| ✅ Paper Type: Free Essay | ✅ Subject: Mechanics |
| ✅ Wordcount: 1165 words | ✅ Published: 23 Sep 2019 |
Heat Sinks?
Abstract…………………………………………………………….
Introduction………………………………………………………….
Research…………………………………………………………..
Biblical Application…………………………………………………..
Experimental Section……………………………………………………
Materials and Methods
Results
Discussion
Conclusion
Bibliography
Abstract
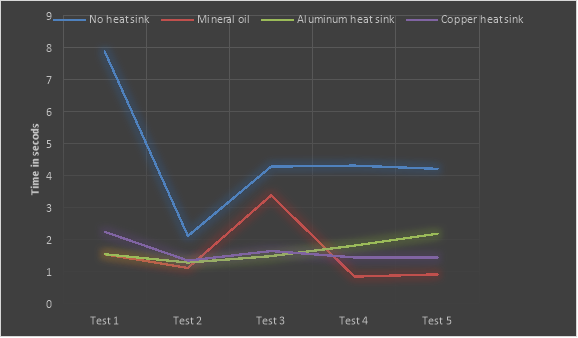
LEDs (Light Emitting Diode) are used in almost every machine whether it be a tractor, assembly line or a elevator. They are in these machines because they are energy efficient using less than ninety percent less energy than other light sources and are environment friendly. Four different types of heat sinks will be tested with red LEDs, one of the four will have no heat sink attached to it and will be timed by how long it stays on before it burns out. The LEDs were tested five times on each heat sink. Of the four heat sinks tested: no heat sink, mineral water, aluminum, and copper: no heat sink stayed on the longest.
Introduction
What heat sink will prevent a diode from frying the longest? This experiment will test what type of heat sink will prevent the diode from frying the longest. Some of the heat sinks that will be used are copper, aluminum and mineral oil.
Research
To understand how circuit boards are made, their first needs to be a understanding of soldering. Soldering is when solder is melted into a liquid to bind electrical components to a Perf Board. Solder is usually made of tin and lead. The most common solder is made up of sixty percent tin and forty percent lead. When you solder the tip of the soldering iron gets hot, so be careful not to touch it. Each time something is bound with the soldering iron, the tip of the soldering iron must be cleaned. The reason behind this is because the tip of the soldering iron oxidizes and can get the metal dirty causing the metal to not bind properly. The solder in this experiment will be used to bind the Perf Board with the diode. The specific diode that will be used in the experiment is a LED.
LEDs are a semiconductor device that emits incoherent monochromatic light. A LED contains a chip of semiconducting impregnated with impurities make a PN junction. The color of the LEDs depends on the amount of bandgap energy in the materials forming the PN junction. The materials used in the PN junction give of this bandgap energy that corresponds to near-infrared, visible or near-ultraviolet light. During the experiment the LED will have a heat sink around it to prevent it from frying faster than it does without one.
The heat sinks that will be used for the experiment will be passive heat sinks. Passive heat sinks have no moving parts, for example a fan. The most common material for a heat sink is aluminum because, it is light weight and has good thermal conductivity. There are many different types of passive heat sinks. A few of them are bonded heat sinks, skived heat sink and a stamped heat sink.
Biblical Application
Genesis 31:40 says, “This was my situation: The heat consumed me in the daytime and the cold at night, and sleep fled from my eyes.” This verse can be applied to the experiment since diodes give off a lot of heat which make them fry faster but, with heat sinks the diodes fry slower. They fry slower because, the heat sink moves the heat away from the diode so it gets cold. When the verse says, “the heat consumed me”, it represents a diode without a heat sink. The diode with a heat sink is when the cold consumes him at night, since the heat sink is making the diode cold.
Experimental Section
Materials and Methods
The following materials were used in this project:
- Mineral oil
- Aluminum heat sink
- Copper heat sink
- 4 Wired alligator clips
- 19.5V Power supply
- Perf Board
- Insulated copper wire
- Soldering Iron
- Solder
- 2 Rotary Potentiometer, 1kohm, 2 W, ± 10%, 93 Series, 1 Turns, Linear
- 30-50 LED, Red, Through Hole, T-1 (3mm), 20 mA, 1.85V, 640 nm (Bought 50)
- Rocker Switch, Non Illuminated, DPST, On-Off, Black, Panel, 10 A
- Stopwatch(Recorded the experiment and wrote down the times after I was done)
- Grinder(Used to take off most of the LED casing without exposing it to air)
- Small plastic container
The steps used to conduct the testing of this project are:

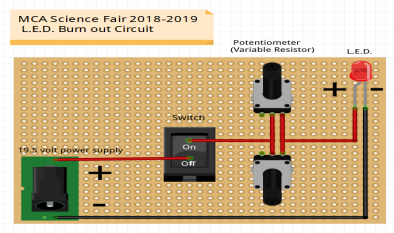
- Make the LED Burn Out Circuit.
- Attach a LED to the positive and negative ends of the circuit(The long wire on the LED is negative and the short end is positive)
- Test the circuit with one LED (If it the circuit doesn’t work make sure the positive and negative wires aren’t touching each other
- Attach another LED to the circuit
- Turn on the circuit and record how long the LED was on till it burned out
- Repeat Steps 4-5 four more times then proceed to Step 7
- Grind fifteen LEDs plastic casing until there is just a little plastic around the casing
- Pour mineral oil in a small plastic cup
- Attach a grinded LED to the circuit and put it in the mineral oil
- Turn on the circuit and record how long the LED was on till it burned out
- Repeat Steps 8-9 four more times then proceed to Step 11
- Make an aluminum casing for the LED, make sure that there is a hole to see the light from the grinded LED and a place to easily put in and remove the LED
- Put a grinded LED in the aluminum casing and attach it to the circuit
- Turn on the circuit and record how long the LED was on till it burned out
- Repeat Steps 13-14 four more times then proceed to Step 16
- Make a copper casing for the LED, make sure that there is a hole to see the light from the grinded LED and a place to easily put in and remove the LED
- Put a grinded LED in the copper casing and attach it to the circuit
- Turn on the circuit and record how long the LED was on till it burned out
- Repeat Steps 17-18 four more times
Results
The graph shows how long the LEDs lasted.

Discussion
This experiment did not work. A few of the reasons it didn’t work is because of some of the heat sinks were not designed as they should have and the power had to be increased by a power supply instead of AA batteries because the LED was not burning out. Some of the reasons the experiment did not work as it should have was due to procrastination.
Conclusion
Based on the results, the hypothesis was incorrect. There were certain things that should have been thought of before the experiment that was not
Bibliography
- Akhtar, Farozan. “Why Are LED Lights Becoming Popular?” 99acres Article, 17 June 2016, www.99acres.com/articles/why-are-led-lights-becoming-popular.html.
- “6 Heat Sink Types: Which One Is Best for Your Project?” Gabrian, 13 Dec. 2017, www.gabrian.com/6-heat-sink-types/.
- Jeff. “Announcing the ‘Soldering Is Easy’ Complete Comic Book!” MightyOhm, 18 Feb. 2018, mightyohm.com/blog/2011/04/soldering-is-easy-comic-book/.
- “Light-Emitting Diodes (LEDs).” Emred, 18 July 2007, web.archive.org/web/20180319221605/http:/www.emred.fi:80/htmls_en/leds_en.html.
Cite This Work
To export a reference to this article please select a referencing stye below:
Related Services
View allDMCA / Removal Request
If you are the original writer of this essay and no longer wish to have your work published on UKEssays.com then please click the following link to email our support team:
Request essay removal


